Coventry Domains is fantastic for creating something special… a domain of one’s own. However, we live in a highly interconnected and collaborative world and sometimes, it’s good to collaborate.
Here’s a guide you can use as a group of students or as an educator to set up a group project using Coventry Domains.
- Step 0: Have a clear goal in mind
- Step 1: Choose a group admin
- Step 2: Create a WordPress install and add users
- Step 3: Create the content
Have a clear goal in mind
Before you set out to build a blog, portfolio, magazine style site or anything else, you should have a clear idea of what it is you’d like to achieve.
If you are a student and a lecturer has asked you to create a group site, the lecturer will provide a detailed brief of what sort of site each group will be working to build, what’s expected of each person, and how the site will be assessed.
If you are a staff member looking to create a group site for a department team, you will need to have a clear understanding within your team of the purpose of this site and the role each member of the team will take in building, maintaining and contributing content to the site.
To get a start on planning out a website, see our material on the Coventry Domains Learn knowledge base on how to plan a website.
Choose a group admin
Because the entire group will be working on a single project website, you’ll only need one person with a Coventry Domains account to get started.
The way Coventry Domains works is that each eligible user is given access to their own space on a server and a cPanel account. The student can then use this space to install a Content Management System like WordPress (or Drupal, Joomla, Grav, MediaWiki, etc). Therefore, the group or the lecturer will need to nominate one person to set up the site.
One person from the group site team will need to create a Coventry.Domains account and they will be responsible for installing a Content Management System on their space. They will then need to give access to the backend of the website to other team members so that they can contribute to the website.
Keep in mind that anyone setting up a Coventry.Domains account will need to agree to the Terms and Conditions of service, which means the group admin must take personal responsibility to ensure standards of copyright, privacy and legality are observed.
Once a new site is set up, this admin will be able to give the other group members to the site by adding them as users (more on that in a moment).
Install WordPress and add users
If the group admin hasn’t already done so, they should read through our articles on Making Your First WordPress Site to get started.

Once the WordPress site is up and running, they’ll be able to add new users to the group project site.
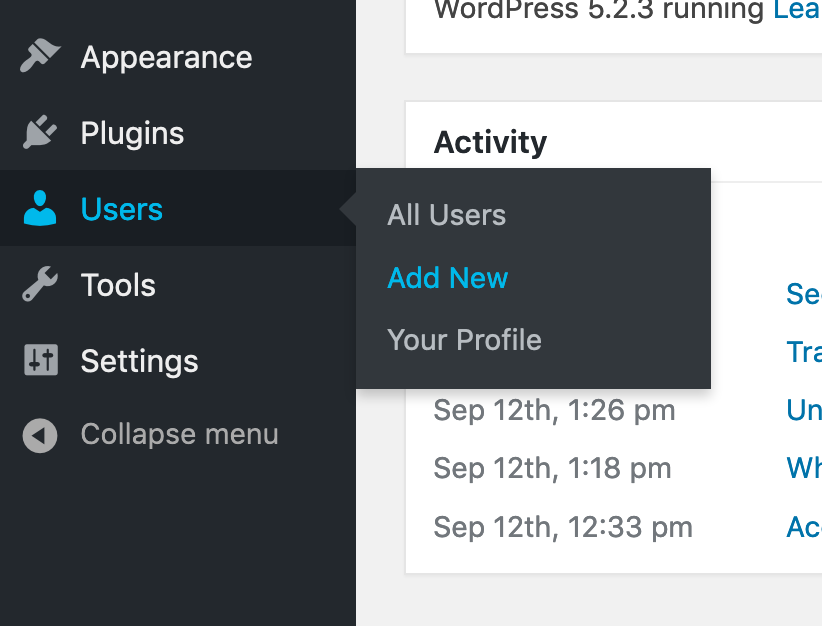
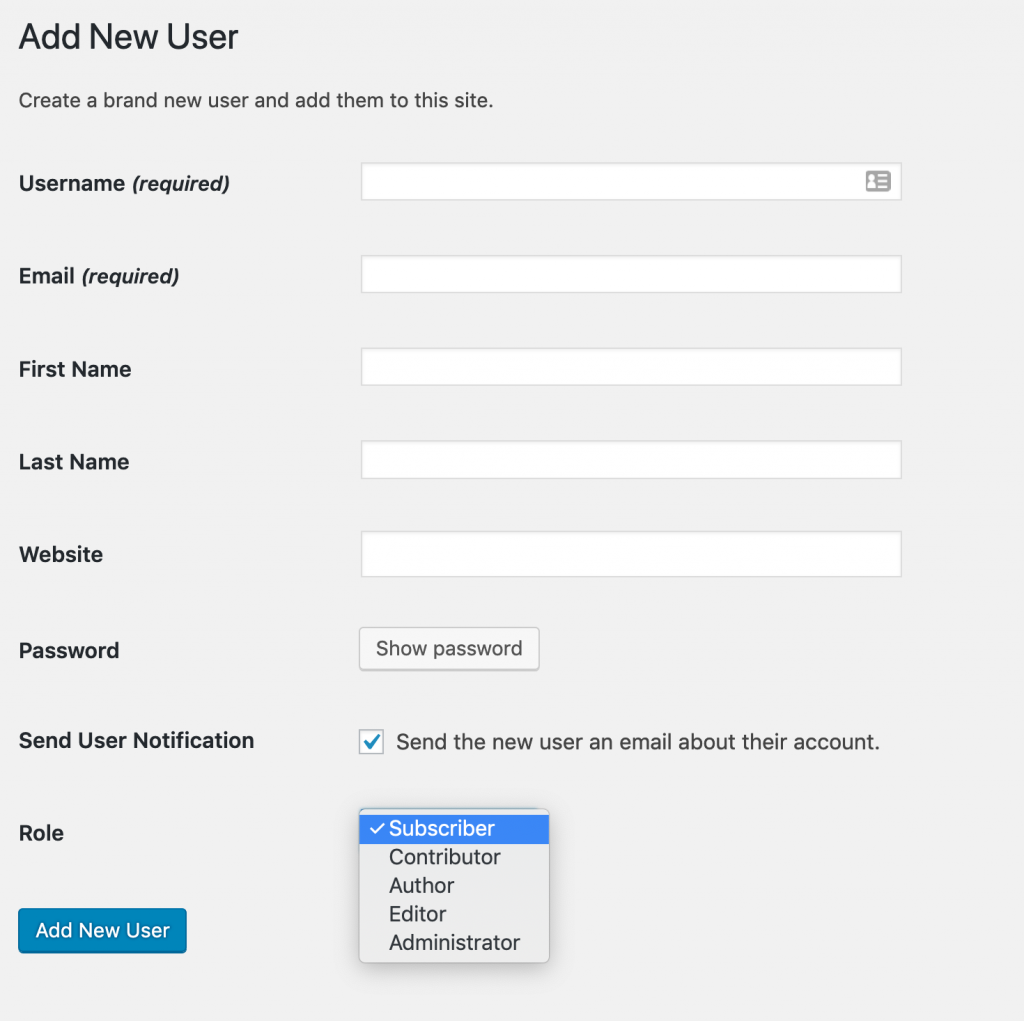
Head to Users from the WordPress dashboard and select Add New. Here you can add the username, university email address and create a password.
A note on passwords
Creating a new user in this way means that user must remember their password. WordPress will send a confirmation email to them when their account is created and allow them to change this password at any time.
The admin, on the other hand, will be able to log into this WordPress site via the Coventry Domains dashboard using their university single sign on details.
User roles in WordPress
WordPress has various roles available for new users when being added to a site, each with varying levels of access:
- Subscriber – Lowest level of access: can only read site content
- Contributor – Can create but not publish their own posts
- Author – Can create and publish their own posts
- Editor – Can create, publish, approve and delete anyone’s posts
- Admin – Full site control over posts, pages, themes, plugins and settings

By default, new users are given the role of Subscriber, but this isn’t ideal.
If the group members are being assessed equally on the content, presentation and functionality of the site, they should all be given the role of Admin. Otherwise, Editor or Author would be good choices.
For example, on some projects, it might be appropriate to have a single Admin working as a site designer/webmaster, another person curating, proofreading, sourcing images and editing posts as the Editor and all other group members creating content as Authors or even Contributors.
Create the content

Here’s the fun part. Once you’ve got your brief, chosen an admin and given the team access to the site, you can start creating posts, pages, blog content, portfolio pieces, embed music and video and whatever else you’d like to do.
During the content creation phase, it’s imperative that group members communicate well with one another and stick to deadlines. A group web project is meant to be ambitious, but it’s not something that can be done by a single person working close to the final deadline.
